
Wednesday, April 07, 2010

Flower-Ruffle Onesie

Spring flowers have me in the mood....to create.

My gift for you? A Flower-ruffle Onsie tutorial!


Let me start by saying...I am not a seamstress. This project is not difficult to complete. If you can sew a straight line, then YOU can make this!

I will show you how to make the singed flowers, corsage detail on front and of course, the flower-ruffle bottom on the back.

For another good tutorial on the singed flowers check out Linda's post here for a singed flower knee-high/pantyhose headband at Craftaholics Anonymous. There is a great tutorial for a Ruffle-butt Onsie on U Create, created by Char on Crap I've Made,  that you might enjoy, if you like this one.

I'm sharing this post at the following fantastic sites:


Please use this only for personal use. If you decide to try this yourself - send me a picture of your creation & I'd love to see what you've made. Also, if you do share this tutorial, please let me know & pass on my link!


Thanks! Materials:
Scissors
Ruler/Measuring Tape
Lighter/Candle
Bowl of water
Synthetic Fabric
Beads or buttons
Fabric paint with small tip (or q-tip)
Coordinating Thread
Onesie


Directions:
1. Begin by cutting various sizes of circles out of your synthetic fabric. I got my fabric from the miscellaneous scraps at Hancock's Fabrics for $0.98!  You'll want Large, medium and small circles. 
2. Light your candle, or grab your lighter. Make sure your bowl of water is nearby. Hold the circle of fabric just outside the flame, so that the fabric is melted slightly around the edges. Approach this as you would if you were roasting marshmallows & BE CAREFUL! You don't actually want to catch the fabric on fire. Using a synthetic material is also important - natural fibers won't singe.
 3. Once your petals have all been prepared, arrange concentric circles. I used 1 large, 3 mediums & 3 smalls for the corsage on the front of the onesie and several large & smalls for the bottom ruffle. You can play with the arrangements. Some fabrics look better with more layers.  For the corsage ruffles, this is the point where you would place your bead on top, and sew through the bead with your thread doubled. Knot it on the back of the flower and repeat until the bead is securely fastened.


 4. Secure the flowers to the front of your onesie by hand following the same technique as above - through the bead. After all flowers are in place, sew through all layers from the wrong side of your onesie out through the flower layers to create anchor points to keep flower from wrinkling up after washing.

Step back & admire your handiwork! Your front is finished.

5. Measure up 3 inches from the edge of the leg on the onesie. Arrange your flowers in a straight line and across the onesie and pin in place. I chose to use only large and small petals at this point. Gradually move them through your machine, being careful to pull the pins out before sewing & make sure the petals are laying flat as you continue sewing in a straight line. Backstitch at the beginning and end of your line of flowers to secure them in place. (You could hand sew these if you are uncomfortable with a machine. Just be sure to secure your flowers in place).  The sizes of the flowers can vary some, so don't worry if your circles are imperfect. These imperfections give it more personality.  I used 7 flowers across the length of the onesie.
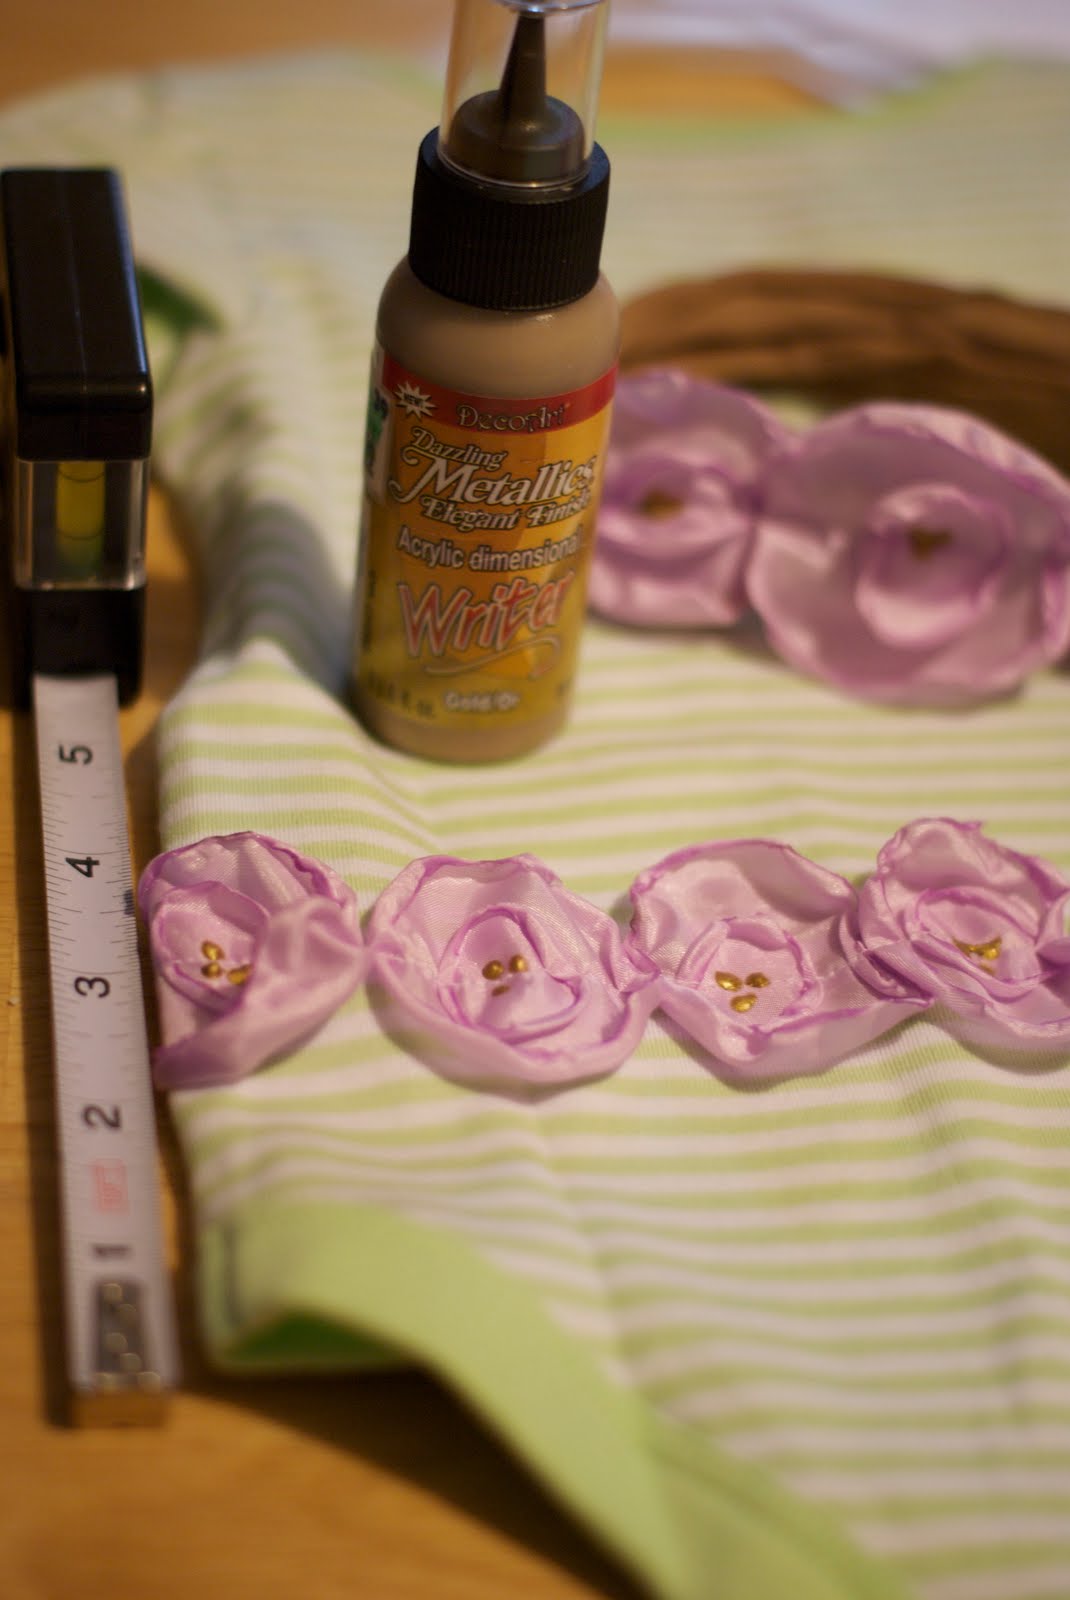


6. Using fabric paint, dob the center of each flower to bring them to life. I chose not to use beads on the back, to make it more comfortable & practical for little ones to wear.


7.  Let it dry & celebrate again because your project is finished! You've got a super cute flower-ruffle onesie on your hands! Enjoy watching your little girl or your friend's little girl waddle or crawl in this sweet little outfit!

-Mandy

Update!

Friends,

This site is now my craft/creation site. I have moved all personal postings to my other blog 
If you're interested in accessing that site, send me an email & let me know.  I'd be happy to add you.

I used the export/import feature on blogger.com. It wasn't as difficult as I had anticipated, and I'm relieved that things are a little more organized now.

Hope you (still) enjoy!

Mandy

Tuesday, March 30, 2010

Spring Things


I made some Spring Chick & Egg Peep Cupcakes for Jonas' 1st birthday a couple of years ago.
(YIKES! Has it already been that long!) He is a Spring baby, so I wanted to share my little creations with you. I used noodles and melted marshmallows to create nests similar to "rice krispy treats". Then I perched a Peep marshmallow chick on top, along with a few Malted milk eggs.  Then I placed them on top of a frosted cupcake.
For his first birthday cake I used the edible grass, which is actually kind of tasty, and formed a nest for the peeps and eggs with that. I used Angel food for the cake and cupcakes, because it was his first time to encounter sweets and I thought that would be an okay transition for him. It served its purpose well, but under any circumstance, I would probably recommend a firmer cake recipe.

My mom brought over a lot of fancy party food and it was devoured by guests - as usual. She is an amazing hostess and can whip up some amazing food in no time. She even cut out the sandwiches to look like little ducks. So cute!
I made a center piece with a Springy window flower pot and some floral stems, snipped from a different project. I mounted multi-colored balls to the tops for fun & interest and used moss to cover the foam holding the stems in place. Thank you Dollar Store.


Please enjoy the pics and ideas, but if you repost my pics please let me know! ;) Unfortunately - we didn't have a good camera at the time, but you should be able to get an idea. ;)

Thursday, March 11, 2010

Fixn' Chicken

Well,
It's official.
I'm no longer a Chicken Virgin.

It's amazing, but up until this point in my 30 years of life...I've somehow managed to avoid cleaning, stuffing, tying or prying chickens, turkeys or any other poultry for that matter.  It's true that I have eaten my fair share of fowl, but I have managed to avoid the dirty details of fixing most things that look like they do in life...until yesterday.

We purchased some frozen organic chickens a while ago, and he carved one that we made several meals from about a month ago. With freezer storage space at a premium, we decided it was time to cook some more chicken. In all honesty, I've only been avoiding it - because it kind of terrifies me. After my encounter with it yesterday - I understand why. Even though the insides have already been cleaned out - it still kind of grossed me out. I know once it's cooked, I'll feel much better about things, but here's to you little (er..big) chicken.

We found this blog which gave us ideas for 1 chicken, 17 healthy meals at cheaphealthygood.blogspot.com  - check it out here: http://cheaphealthygood.blogspot.com/2009/02/1-chicken-17-healthy-meals-26-bucks-no.html.  So, we're giving it a try.

I'm cooking Marcella Hazan’s Roast Chicken with Two Lemons  (recipe at the above site) for dinner tonight with roasted potatoes and carrots.  I'm excited about the rest of the meals to follow later this week. I guess if I'm going to fix my first chicken - I might as well do it right.  Our chicken is a whopping  9.5 lbs!  I am curious to see how long it takes to fully-cook.

I'll let you know how the recipe turns out later! For now....it smells DE-LIC-IOUS! I feel so gross just discussing my carnivorous ways. Oh well ;(

Dear Lord: Please bless this food!
Amen & Happy cooking!

Mandy

Wednesday, March 03, 2010

My Beautiful Babies

They are the sunshine in my day. ;) Things have been much smoother the past few days.  Thanks for all of your sweet comments & encouragement. I know so many times incidents like the one I mentioned happen to others &  and go unmentioned. Thankfully, I was forgiven in full the night of the event, but it did serve as a wake-up for me - just a friendly reminder of how precious my 2 little gifts are. I cherish every minute of my time with them.

Anyway, I had a couple of goodies to share. I played with picnik photo editing today for the first time, and LOVED it. If you have not tried it yet....you really should. ;) 

I'm thinking of using the following photo for Marin's birth announcements. I know..it's a little late, but it might still be fun. What do you think?

Monday, December 28, 2009

Merry CHRISTmas to all!


Hey everyone! Hope you had a fantastic CHRISTmas full of fun, family and friends. We just wrapped up our final celebration with family and I am feeling overwhelmed with love. ;)

I am planning on posting some of the cool items from my giftbox...I can't resist sharing. The reason for the season is NOT forgotten! Thank you Lord for giving us a reason to celebrate the birth of your son!

I also plan on posting some craft things I've done lately. I just need to organize my life first. I know with the arrival of my little one soon, I'll have a lot of time sitting.....and hopefully some time to organize my pics and thoughts for some tutorials.

I also am looking forward to hopefully starting an Etsy store and Craft group with my family! I have some pretty talented friends and family & can't wait to get together with them to try out some new ideas!

What are you thankful for? What are a few of your favorite things? What are you looking forward to in the New Year?

Thursday, November 26, 2009

Happy Thanksgiving!

Hey everyone! Happy Thanksgiving. I'm slacking on my picture duties lately...and well-aware that this is a no-no for any blogger. ;) So, no pictures today, but I wanted to say that I feel so blessed to have such amazing family and friends. Thank you all for being such a big part of our lives. You are truly loved!

Sunday, November 01, 2009

Play kitchen craft-along

I have a fun project to work on...and hope some people will join me. I *may* not get it finished along with the rest of the group, but I will pay close attention the tutorial, and hopefully end up with a new play kitchen eventually.

I wanted to share this great craft-together workshop from "Out of the Crayon Box".

What do you say? If I get good at these, maybe I'll try to do what she does and sell them to raise $ for charities. Sounds fun huh?

Saturday, October 17, 2009

Blue's Clues Pumpkin


My little guy came home from his school with a small - but perfect - pumpkin. :)

He immediately asked for a Blue's Clue Pumpkin. I wasn't sure how I was going to carve Blue onto such a small pumpkin, but I was able to paint it. He was excited & he even got to help.

On one side I drew Blue, then painted her in. On the other side, I drew Blue's clue paw print. After the little artist painted away on his side, I filled it in with blue glitter & outlined it with glow-in-the-dark paint. That should be a fun clue for trick-or-treaters!

It was a TON of fun. Go get painting! ;)

Thursday, October 15, 2009

Love this site - wanted to share!


I just wanted to share that I found a site today that I might have a little crush on. Mainly because of the possibilities it offers. I am so excited, and can't wait to get to try out some of the fabrics they offer.

They have a blog & a website. Please check them out, then show me what you make! ;)

www.fabricworm.com

http://blogspot.fabricworm.com