Monday, May 10, 2010

Link Parties

I wanted to make a page for parties I link up to & parties you should check out!  I'll edit this post as I find new fun parties to link to. I don't know how to make these show up on a separate page, but if someone wants to let me in on the secret, I'd love to do it that way!


Mondays:


Sumo Sweet Stuff

The DIY Show Off

The Girl Creative

Making


Tuesdays:

All Thingz Related


Wednesdays:

Show and Tell Green


The Trendy Treehouse


Transformation Thursday


Fridays:
 Favorite%2BThings%2BFridaybig%2Bbutton.jpg


Saturdays:


Join us Saturdays at tatertotsandjello.com for the weekend wrap up party!

Sunday, May 09, 2010

Mother's Day Matching Outfits!

Happy Mother's Day to all of the Mommies out there.

My two little bundles of joy are the best gifts I could ever ask for.  I have never been happier or felt a deeper sense of purpose then when I became a Mom to Jonas & Marin. I love you my sweet babies. Thanks to God for allowing me to be your Mommy I love you so much!

It was on this day last year that I announced to Clint that we were expecting our second child. This year, she's here & almost 4 months old. I did it with a special shirt that my son wore to announce the big news to Dad. He was so little then, but was ready to become a BIG brother! This year we celebrated at a brunch with my Mom & will hopefully get to celebrate with Clint's mom later this week. We have the best Mom's in the world. We are both so incredibly thankful for you and blessed to be able to have such wonderful role-models for our lives and for our little ones. Happy Mother's Day.


After stumbling across some fabric that reminded me of my favorite skirt, I decided it would be fun for Marin and I to have matching Mother's Day outfits. I bought a onesie and decided to attempt to tackle an empire large elastic waistband dress.  I didn't use a pattern, but just kind of played with the material until it looked the way I wanted it to.

After preparing the skirt, the stitches were showing through the elastic, and I decided it needed some kind of band. The onesie was a few sizes too big as well, so I left the band loose at the back to be able to cinch up as needed.  After playing around a bit, I eventually decided to connect the skirt to the onesie with some darting, just to hold the skirt in place, as I figured it may be a bit too large for now. Eventually I will take the two apart and use them as separates, but for now it works really well, and looks so cute on her. I am excited about how versatile this little outfit will be.
Then I decided, at 3:30 in the morning, that Jonas really needed to be included on the fun, because he is my little guy.  I decided to make him a coordinating "tie t-shirt" and even included a little faux "pocket" and handkerchief square to match his sister's skirt.  

LOVE IT!  They were so cute at brunch & I think they really liked their little outfits too. ;) It was a sweet Mother's Day for sure. Even if I sacrificed much needed sleep for sewing.

Enjoy & Happy Mother's Day to you!

P.S. I link to these fantastic parties. Check them out! I'm also doing kid's clothes week!


Tuesday, May 04, 2010

Cool! My Flower-Ruffle Onesie was featured!

Totally Tutorials Blog 

You can find it on Totally Tutorials: here

http://somedaycrafts.blogspot.com/" target="_blank">Photobuckethttp://i475.photobucket.com/albums/rr116/alishascorner/FeaturedButton1copy.jpg"/>
It was also featured on Someday Crafts!:  here

Monday, May 03, 2010

Zooper-Duper 3rd Birthday & More!

The party was a huge success even if the pictures I took don't really do it justice. (Heather...help!)


This year I wanted to give party favors that the kids could take home and use again during play. Jonas helped me pick out some fun animal fabric and I made tails and ears for all of the kids.  The tails were secured with elastic waistbands and the ears were on foam visors that I purchased at my local craft store. I attempted many techniques for securing the ears, and finally discovered that I could actually sew onto the foam. The kids got so many compliments as they frolicked around the zoo like little leopards. They were so cute!

The party was at the zoo's train station, as requested by my little man. My mom made the most adorable Thomas & circus train car cakes, complete with flamingo topper, because Jonas loves them.

She tried her hand at fondant icing for the first time, and I think she did an amazing job. Did I mention the cakes tasted delicious too? They did! My Nana prepared the goodie bags for each child. They had so many fun things inside including...animal crackers! Perfect!

After celebrating on the deck, I passed out some reusable scavenger hunt cards I created for the kids using animal photos and characteristics laminated for reuse, along with crayons, and we headed for the train. I'm going to keep that trick up my sleeve. When they got bored, they were able to color on the blank back!
The weather, although insanely windy, was beautiful and our amazing friends and family helped make Jonas' 3rd birthday so memorable. Can't wait to see what we'll get to try next year!  All Aboard!!

Saturday, April 24, 2010

We're Going to the Zoo, Zoo, Zoo!!

We're going to the zoo, zoo, zoo.
How about you, you, you?
You can come too, too, too.
We're going to the zoo, zoo, zoo.

For my little guy's 3rd birthday, we're heading to the zoo! Tomorrow is the big day & sunshine is in our forecast, so we're looking forward to fun!  I've made some treats for our little party animals & can't wait to share them once I've got the kiddos corralled.

There will be animals, trains, costumes, food and fun! More to follow soon!

Wednesday, April 07, 2010

Flower-Ruffle Onesie

Spring flowers have me in the mood....to create.

My gift for you? A Flower-ruffle Onsie tutorial!


Let me start by saying...I am not a seamstress. This project is not difficult to complete. If you can sew a straight line, then YOU can make this!

I will show you how to make the singed flowers, corsage detail on front and of course, the flower-ruffle bottom on the back.

For another good tutorial on the singed flowers check out Linda's post here for a singed flower knee-high/pantyhose headband at Craftaholics Anonymous. There is a great tutorial for a Ruffle-butt Onsie on U Create, created by Char on Crap I've Made,  that you might enjoy, if you like this one.

I'm sharing this post at the following fantastic sites:


Please use this only for personal use. If you decide to try this yourself - send me a picture of your creation & I'd love to see what you've made. Also, if you do share this tutorial, please let me know & pass on my link!


Thanks! Materials:
Scissors
Ruler/Measuring Tape
Lighter/Candle
Bowl of water
Synthetic Fabric
Beads or buttons
Fabric paint with small tip (or q-tip)
Coordinating Thread
Onesie


Directions:
1. Begin by cutting various sizes of circles out of your synthetic fabric. I got my fabric from the miscellaneous scraps at Hancock's Fabrics for $0.98!  You'll want Large, medium and small circles. 
2. Light your candle, or grab your lighter. Make sure your bowl of water is nearby. Hold the circle of fabric just outside the flame, so that the fabric is melted slightly around the edges. Approach this as you would if you were roasting marshmallows & BE CAREFUL! You don't actually want to catch the fabric on fire. Using a synthetic material is also important - natural fibers won't singe.
 3. Once your petals have all been prepared, arrange concentric circles. I used 1 large, 3 mediums & 3 smalls for the corsage on the front of the onesie and several large & smalls for the bottom ruffle. You can play with the arrangements. Some fabrics look better with more layers.  For the corsage ruffles, this is the point where you would place your bead on top, and sew through the bead with your thread doubled. Knot it on the back of the flower and repeat until the bead is securely fastened.


 4. Secure the flowers to the front of your onesie by hand following the same technique as above - through the bead. After all flowers are in place, sew through all layers from the wrong side of your onesie out through the flower layers to create anchor points to keep flower from wrinkling up after washing.

Step back & admire your handiwork! Your front is finished.

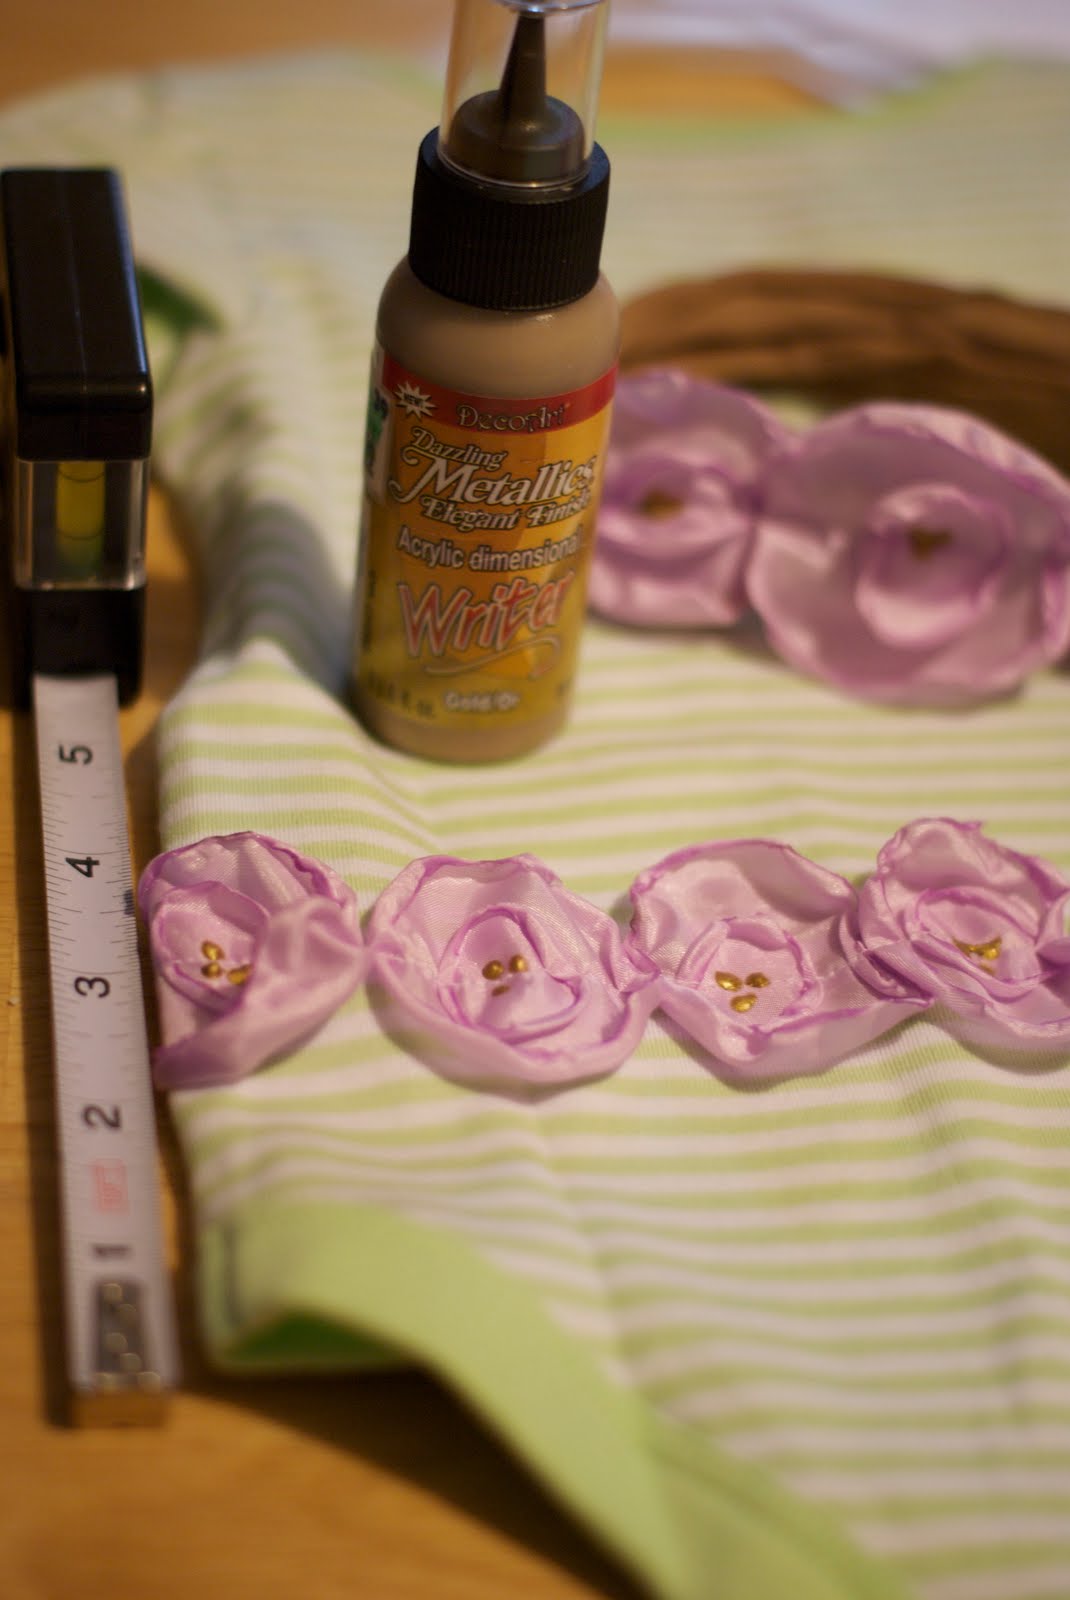
5. Measure up 3 inches from the edge of the leg on the onesie. Arrange your flowers in a straight line and across the onesie and pin in place. I chose to use only large and small petals at this point. Gradually move them through your machine, being careful to pull the pins out before sewing & make sure the petals are laying flat as you continue sewing in a straight line. Backstitch at the beginning and end of your line of flowers to secure them in place. (You could hand sew these if you are uncomfortable with a machine. Just be sure to secure your flowers in place).  The sizes of the flowers can vary some, so don't worry if your circles are imperfect. These imperfections give it more personality.  I used 7 flowers across the length of the onesie.


6. Using fabric paint, dob the center of each flower to bring them to life. I chose not to use beads on the back, to make it more comfortable & practical for little ones to wear.


7.  Let it dry & celebrate again because your project is finished! You've got a super cute flower-ruffle onesie on your hands! Enjoy watching your little girl or your friend's little girl waddle or crawl in this sweet little outfit!

-Mandy