Saturday, July 10, 2010

Knot & Pearl Necklace Winner!

And the winner of the Knot & Pearl necklace is........

----------------------------------------------------
RANDOM.ORG

True Random Number Service

Random Integer Generator

Here are your random numbers:

12
Timestamp: 2010-07-10 21:05:19 UTC
-----------------------------------------------------

That's KELSEY! She said:

Blogger Kelsey said...
That necklace is beautiful!! Seems like fun to make too! I love the DIY themed blogs...especially furniture! I'm always up for a good before and after reveal...and bloggers with a sense of humor and the ability to make me laugh always have me checking in to see what they're up to.
July 02, 2010 10:29 PM
 ------------------------------------------------------

I will have some of these in my etsy shop soon! So if you didn't win, please check back. 

Thanks to everyone for entering. Thanks to those of you who chose to follow my blog & Congratulations to Kelsey! 


Thursday, July 08, 2010

Lemonade - Bib Necklace

I shared this Lemonade - Bib Necklace tutorial at Meet Virginia. If you haven't had a chance to visit Morgan there, please take a minute & say hi! You'll be so glad you did!

Ready to see what we're making today?
 Lemonade - Bib Necklace
This sweet little bib necklace can help you add a quick burst of color to any outfit. The colors conjured up images of a lemonade stand and sunshine.  Good news too....it's relatively quick. I made this in under an hour while my little one was napping.
Materials:
{Doily, Necklace or Necklace parts, Assorted sizes of circles cut from Jersey cotton fabric and tulle, buttons, beads, coordinating thread}
Instructions:
1. Fold your doily in half & align as desired. Then open back up, insert place holder along fold. (I used a chopstick, then switched to a shish-ka-bob skewer) and apply Craft Glue to one side, following the lines of the doily, leaving the fold unglued.  I know this is difficult to imagine, but the goal is to have an opening to slide a necklace chain through when the doily is dry. 
2. Cut your circles in varying sizes out of the jersey material and tulle & set aside
3. Pick out some fun beads & buttons and lay them out to determine how you want the placement on your necklace bib.
4. Layer the circles of tulle and jersey as desired, then sew buttons or beads securely onto center of each "flower". 
5. Secure flowers and buttons onto doily by sewing into place using coordinating thread. (You could probably glue these, but sewing them makes the entire necklace more secure.)
6. Slide your necklace or chain through the doily bib and admire your cute new necklace. You're finished!
Or if you'd rather skip the making & go straight to the wearing.....get one in my etsy shop!

Wednesday, July 07, 2010

Meet Virginia - Blog Swap & Tutorial

Hey friends! As promised, beautiful & talented Morgan of Meet Virginia is here today sharing a fabulous tutorial.  I can't get over the colors & she used a duvet cover...so clever! Hop over to her site & take a look around when you get a chance. You'll find me there today too!

Hey Guys!
I'm Morgan!!!
From:


A Little About Me:


~I LOVE to be creative in any shape or form! I started Meet Virginia as an outlet for being creative and to share ideas with everyone in the blogosphere!


{Plate Mural}


~I love fashion! I graduated from a Fashion Merchandising program in the fall and loved every minute of it!!


{Funky-O Scarf Tutorial HERE}


I also do a weekly posting called: Weekend Wear. It's fun, and full of great tips on current trends, and how to dress for your body type!


{Check out the latest Weekend Wear HERE}


~I am a TV fanatic! Some of my favorite shows are: Survivor, The Big Bang Theory, Project Runway, Design Star, The Hills (it's the hubs and I's guilty pleasure!), and so on and so on! I also LOVE to crochet while I watch TV it's so relaxing to me!


{Crocheted Bib Necklace}
~I Love thrift shopping! Taking old things and revamping them is my favorite, and also saves money another one of my favorite things!!


{New Plaques with Personality!}


~I Love blogging and getting to meet new friends like Mandy!! Isn't she the best!


Today I have the EASIEST window treatment ever created....well don't quote me on that but its up there on the super easy scale!


The Before and After:


Before:


{Desperate need of an update right!


After:


{I just adore the stripes! But the hubby on the other hand thought they looked like something that belonged in a pirate ship...? Compliment....I think not ;).}


Want to make some of your own?


Here is what you need:


~I used a duvet cover I bought at Ikea! I bought a full/queen but could have mos def gone with a twin!


~Seam Ripper
~Sewing Machine
~Measuring Tape
~Scissors


How it's done:


1. Remove duvet from plastic and measure both your window and your duvet cover.


2. Seam rip the seams throughout the duvet creating 2 separate panels.


3. Cut your newly made panels to the size determined in the previous step.


4. Sew up your raw edges and a loop for the rod of your curtain to slip through.


5. Slip your newly made curtain panels onto your rod to your liking.


6. Enjoy!


These really have been the easiest project I have done in a while! They took like no time at all and make such an impact on the room!


I also love how they added another print or pattern to the room, adding multiple patterns to a room creates visual interest and adds personality. For sure try it out!


{Various patterns present in my living room.}


Thank you Mandy for letting me swap with you today girl! I had such a blast posting for you guys and can't wait to get to know you better! If you have any questions about anything or just for fun please let me know I am more than happy to help! Hope you all have a great day!! Thanks again! Love, love.


Isn't she fun? Hop on over to Meet Virginia & check it out. You'll be so glad you did!
Thanks again Morgan!

Tuesday, July 06, 2010

Blog Swappin' tomorrow!

Hey everyone! Tomorrow is a blog-swapping day again. Please come by to meet lovely Morgan from Meet Virginia! I'll be posting a tutorial for the beauty below on her site & she's going to post something great for you here. Hope you'll come by and visit!  She has so many fun features - including fun fashion ideas (which I love), tutorials, fun stories and more!


Don't forget about the Knot & Pearl necklace giveaway. That's wrapping up at the end of the week.

4th of July - Star Spangled Cookout

In case you missed my 4th of July post - on Sumo’s Sweet Stuff! , here it is again!  I really enjoyed this activity & appreciated the help from my handsome husband to pull it off.

On to the good stuff! I’ve cooked up something really great for you today in honor of Independence Day! Many people will be warming up their grills in anticipation of the fireworks and festivities, so I focused on bringing a little bit of the celebration to your table, with the help of my handsome and super-talented husband. Let’s get started, shall we?

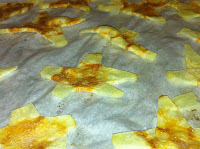
It’s a simple meal – inspired by the American Flag. I used red hot dogs and white buns for the stripes (obviously), and a small blue plate filled with star-shaped Microwave-potato-chips.

These potato chips are the real star of the show. They are not only tasty; they are also quick (Ready in 5 minutes), easy and not fried! ;)

I used this recipe for Uncle Bill’s Microwave Potato chips on Recipe Zaar. Recipe Zaar has millions of recipes, and is easy to sift by ingredient. I’ve used it over and over again with great results every time (so far!).

The low-down for my Star-Spangled Hot Dog Platter follows:

Gather the following:
For Star Potato Chips:
 - 4 large potatoes (russet, yellow gold, white or red potatoes)
 - Seasoning for your chips: Feel free to be creative with your spices (sea salt, granulated garlic powder, seasoning salt, cayenne pepper, dill weed, etc.)
- Vegetable oil
- Food Processor
- Good knife
- Microwave bacon tray (or microwavable casserole dish)
- Parchment Paper (can also be done without)
- Blue plate, bowl, napkin or tissue paper
-------------
For Stripes: 
Hot dogs - (red for extra emphasis)
Buns 
Square dish
------------

What I Did:
1. Wash and peel potatoes
2. Cut angles into potatoes to form points of star. (My husband is demonstrating!)

3. Pull out your handy-dandy food processor or mandolin slicer and slice thin. (The original recipe recommends 1/16”, slicing across the potato.)
4. Oooh & aah over your cute little star potato slices & get your grill fired up!

6. Remove in batches onto paper towels and pat dry
7. Sprinkle with your choice of herbs or spices. (Mine were very lightly salted). 

8. Rub, or mist, your microwave bacon tray, microwavable casserole dish, or Parchment Paper with vegetable oil. (I used parchment paper.)
9.Place a single layer of the towel-dried potato star slices on your choice of the above options, cover with heavy cover or parchment paper and microwave for approximately 5-6 minutes on HIGH until slightly brown & crispy. (No turning required).

10.Plate them on a blue plate, surround with grilled hot dog & bun stripes, and enjoy the star-spangled tasty goodness with your friends and family.

Thanks again to Summer for having me! Hope everyone had a fantastic 4th of July!